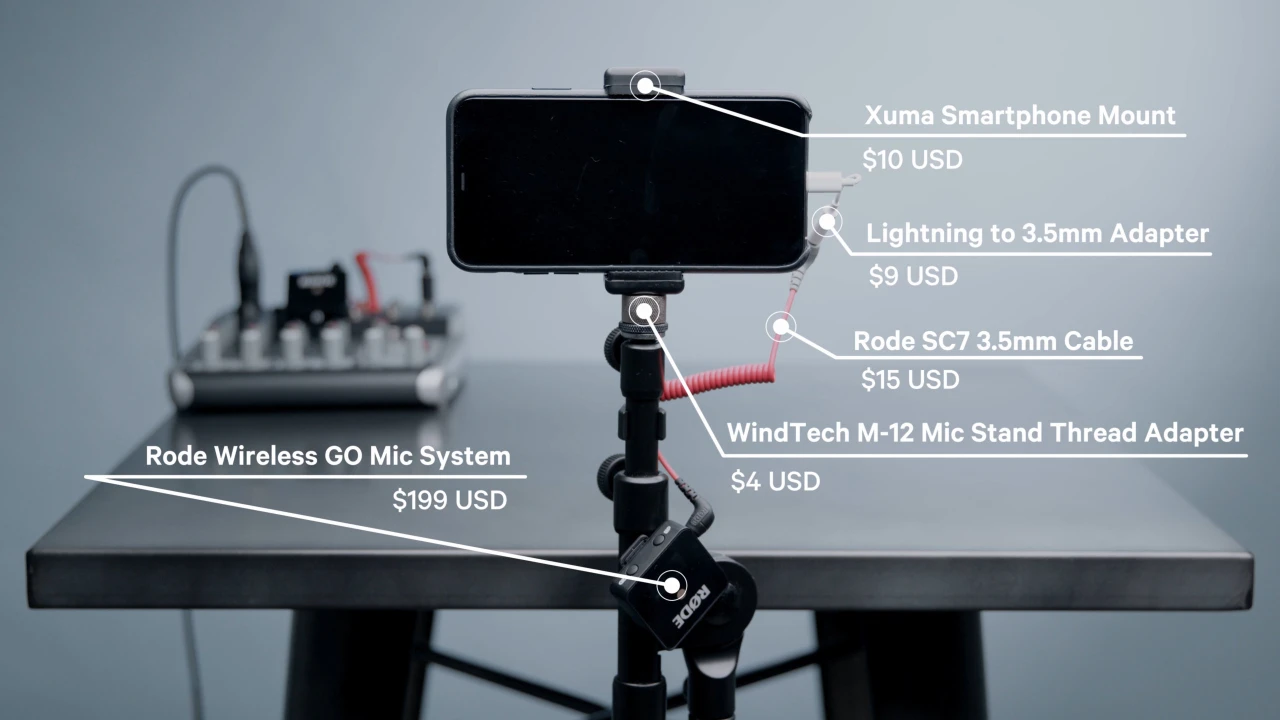
Take the RODE Wireless GO transmitter (the part of the system that wirelessly *sends* audio) and plug into an audio output on your church’s soundboard using the provided 3.5mm cable
Now, take the RODE Wireless GO receiver (the part of the system that wirelessly *receives* audio) and plug it into your mobile device [NOTE: You’ll need a RODE SC7 cable[$15 USD] for this – sold separately]
Because if you’re willing to spend a bit more, you can dramatically improve the quality of your church’s live streams.
Which makes this also a great time to talk about the word I’ve chosen to use in the title of this post – “cheap.”
Cheap is a highly subjective term. There is no concrete definition. What you think is affordable will differ from thousands of others that will read this post.
Which is why I’ve included three different live stream configurations: a $250 setup, a $2,500 setup, and a $0 setup.
Bottom line? It has never been a better time to be creating content online. Camera manufacturers are racing to outdo each other with their products – pushing limits to make gear more capable and affordable. Who benefits from this? You and I.
And there is no better example of this I can think of than the setup I’m about to show you right now.
The BMPCC 4K is – in my opinion – the ultimate video camera for churches. Why? Because it excels in both live production and cinema-style videos. So it’s a 2-in-1 camera.
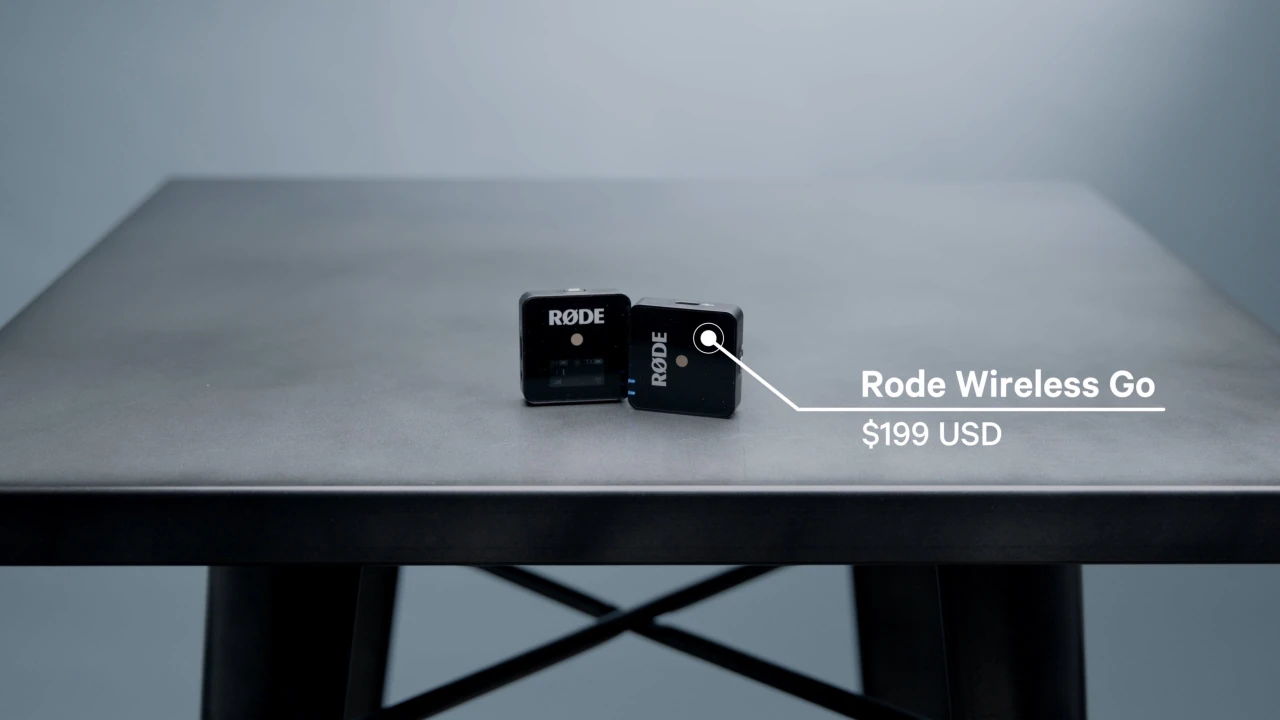
The Blackmagic Pocket Cinema Camera 4K
To equip the BMPCC 4K for live streaming, we need to connect this camera to a computer.
Plug one end of an HDMI cable[$4 USD] into the HDMI port on the Blackmagic Pocket Cinema Camera 4K
Then plug the other end of the same HDMI cable into a capture device (here we’ll be using the Elgato Cam Link 4K[$129 USD])
Plug the Elgato Cam Link 4K into your computer using a USB port (in the image below I’m using a USB-C to USB-A adapter – you may not need this)
Follow each of these three steps, and now, your BMPCC 4K will appear like a webcam. You can now stream from the BMPCC 4K directly to platforms like Facebook or YouTube. Or, you can upgrade your setup even further by using a free tool like OBS Studio or a paid tool like Ecamm Live.
The Elgato Cam Link 4K is a capture device that plugs directly into your computer's USB port
We’re not quite finished with this setup though.
Because again, we need to consider audio.
Now, the BMPCC 4K does have a 3.5mm audio input – so you could use the RODE Wireless GO mic system again here.
But I would not recommend that. Because the BMPCC 4K also comes with a mini XLR input – a more desirable option.
Here’s how to set it up:
Run an XLR cable out of your church’s soundboard using one of its outputs
The BMPCC 4K comes with a Micro Four Thirds mount – but does not come with a lens.
My recommendation? The Panasonic 35-100mm f/2.8[$897 USD]. This lens will excel in lower-light situations due to its maximum aperture of f/2.8. And is the ideal lens for a church live stream setup where the camera is set up between 20-60 feet from the stage.
The Panasonic 35-100mm f/2.8
So what is the overall cost of this configuration?
Well, again, assuming your church has a computer, soundboard, and microphone, this setup comes in at about $2,500. So about 10X the cost of the previous option. Which may not qualify as “cheap” or affordable for you – but will for others.
What’s truly amazing is that the quality of live stream this setup can produce would have cost considerably more just a few short years ago.
If you’re looking for ways to make this setup more affordable, head to the Elgato Cam Link webpage where they list their supported cameras. You could easily cut the cost of this setup in half by going with a different camera and lens – just make sure it’s supported by the capture device that you’re using.
The $2,500 Live Streaming Setup For Churches
The $2,500 Live Streaming Setup For Churches Gear Guide
And this truly is the cheapest option for live streaming.
…don’t live stream.
Instead, take advantage of the YouTube Premiere and Facebook Premiere options.
Premiere is a feature that allows you to upload and schedule pre-recorded videos to then broadcast live on your Facebook page or YouTube channel.
You’ll still get the live chat and interaction capabilities of a live stream – but you won’t have to worry about the intricacies of orchestrating an actual live production.
It’s frankly the best option for many churches.
Hosting a mock live stream using YouTube Premiere or Facebook Premiere is lower stress. And cuts down considerably on cost.
The tradeoff is that it’s more work ahead of time with editing, and filming, and exporting. But if you are looking for the cheapest option – this would be the one.
Summary
There you have it!
Affordable options for live streaming at your church on a sliding scale from $0 all the way up to about $2,500. Importantly, each of these setups will look good and sound good – and none of them are overly complex.
Ready to dive even deeper into live streaming at your church? Here are a few of our most popular resources: